Sunday, February 6, 2011

Blog Prompts #12-16


#12 Describe some differences between still photographs and moving images.
Well, to state the obvious, a still photograph has no literal movement within it, and moving images have actual physical movement within them. Still photographs can be printed on a sheet of paper, a moving image must be "played" on a screen of some sort so that it may be able to take motion.

#13 Describe some similarities between still photographs and moving images.
Moving images can be comprised from a series of still photographs, such as a "stop-motion". A still photograph is a moment of a sometimes moving image that is captured and displayed. Both are images within a particular frame, and both have subject matter and aspects of composition.

#14 Describe some links between photography and the concept of “time”. Describe some links between photography and the concept of “stillness”.
Photography is the capturing of a moment in time. Time is always moving forward, but with photography time can be stopped (not literally); photography stops time in a sense that it records a moment that happens once and then is gone forever. Photography is stillness of a particular subject. Whether the subject is moving or is a still area, taking a photograph of it will capture stillness. Photography can capture a particular moment in time and make it appear still.

#15 Describe how you can you “activate” a photograph that you have already taken. In other words, how can you transform a “still” image into a “moving” one?
Maybe if you took a few images of the same thing, only slightly different (someone waving their hand in slightly different motions on different photos) and then put these images together in Final Cut or something like that, then you could make the still image in to a moving one. I cannot really think of another way to do this, as I am unfamiliar with all of this really. I know this is what we are going to be doing in class so this was the only way I could think of doing this. If there is a way to activate a single photograph and make it moving, then I am unsure of it.

#16 Describe how you might take a “moving” image and make it “still”.
Press pause! Haha....just kidding. You could freeze the frame, so yeah I guess by pausing it. There is probably a better explanation for this but I am not grasping it. You could take a picture of it! 

Tuesday, February 1, 2011

2D and 3D Composites


Composition: For this image, I attempted to create a sense of depth through different photographs/scannographs. I chose a background that receded in to the middle of picture plane, and tried to relate the images on top with the background so as to create a sense of depth. 
Concept: I believe my image is about a sense of depth within a somewhat "collapsing" space. To me, the background seems as though it is closing in on itself, and the images placed on top are supposed to create a sense of depth and space within a 2-dimensional plane. The image is supposed to make your eye travel in to the picture plane and give the eye a sense of distance from the center of the image.
Method: I took an image with a 4x5 view camera for the background, then placed other images on top of it. I made some images larger than others so as to give off the idea of transcending in to space. 
Motivations: I feel as though I have been incredibly repetitive with my description of this image, but I honestly cannot think of another way to describe it. My motivation is to create depth in a 2-dimensional plane, however I feel as though this attempt failed somewhat :(.. I actually just thought of a more successful way to achieve this goal earlier today...(I'll talk about it in a minute)!!!
Interpretation: Talking with you about this idea, I know that you and I both believe there is somewhat of an idea here, it is just not resolved! This is how I feel as well...I am on to something, and I know my idea is there it is just not reflected in the image.
Evaluation: I believe the contrast of the background with SOME of the images works, and with others it does not. I know that a lot of these images do not work together, I really just ran out of ideas the other night and went with what I had...which was not much. In order to make improvements.......
Extension: .....I plan on completely re-doing this photo. I got an idea when you showed me that super awesome sky-image-thing, and I think I will try it with this image. I would like to take two of these images and create different sizes of them, going from large to small, transcending from front to back. I want to create a roller-coaster-like motion with the arrangement of the image, so that it looks like the image is somewhat "bouncing" from the front to the back. I am trying to explain this as best I can, however I think it would make better sense in person!


Composition: I got incredibly lucky with the subject of this composition (the custodian guy!) My composition pays homage to the golden mean, 2/3 - 1/3 composition, as the main subject matter is situated on the right side of the picture plane. The lighting in this room is a bit dull, so I took a longer exposure, about 1/10 of a second, to create a bit more bright and lively lighting. I brought 3-dimensional images in to the picture plane to create a, well, a 3D composite. At first I was disappointed that I could not figure out how to put the skins on the creature, however I believe the shades and planes on the creatures, along with the colors and material of the desk chairs in the class room, create a good scene because they relate to one another.
Concept: With this image, I wanted to create a funny/bizarre scene that would not normally happen in normal life. I spend about four hours a week in this HORRIBLE and uncomfortable class room, and I thought it would be funny to make something unrealistic in it. It was such a happy accident that the custodian was in there, because I see him every day too, and my idea behind this photo was to add some abnormality to the places I see every day.
Method: For this image, I shot a photo of the class room. I then added a snail, ant, and a heron(?) to the image. I wanted the creatures to be larger than life size so as to add to the oddity. It looks as though the man is nonchalantly sweeping away at the ant as the snail slowly goes towards him and the heron tries to bite his head off. Whoa, typing that out sounds really weird!
Motivations: My goal was to create an odd and abnormal scene. I am in this building every day and it is just funny to put a different spin on the every day events here. Originally I wanted to just place as many animals as I could in this image, but I think this idea was more fun and humorous!
Interpretation: Others thought it was funny...as did I! I wish I could make it look more realistic...How do I put the skins on these creatures?!?!?! 
Evaluation: I believe the idea is working in my image. However I believe it is not executed very well. I would like it to look a bit more realistic, not that I want it to look REAL, because there is no way it would be real (well, it COULD happen, but who knows!) I want to make it look more real by adding the skins!
Extension: I originally was going to make a few of these...I took pictures of random places in the Kresge that had good enough space to create bizarre atmospheres. I would like to try this again, but better!!!

Sunday, January 30, 2011

Blog Prompts 9, 10, 11

9. Pick a sculpture that you like. Write a description of how you might use 3D modeling in Photoshop to make this sculpture part of a photographic image. 
I am not very educated on the art of sculpture, so I do not know very many different ones. With that being said I will just say that I really like the steel-like sculpture outside of Kresge (and I do like it! It's weird!) To make this sculpture part of a photographic image, I would probably take a photo of it, make a cut-out of it (using pen or magnetic lasso), and then place it in to another image. Let's say for instance I want to put this sculpture on top of the moon. I would put the cutout on top of the moon and then I would probably do a free transform or transform the perspective of it so that its bottom surface mimicked the round surface of the moon. I would probably also add a drop shadow (is that the one that adds a shadow to the bottom?) to the image to make it appear to be more grounded. I would also transform the object to make it look more 3-dimensional by making part of it protrude towards the viewer.

10. Describe an impossible scenario. Describe how you can create this scene using digital photographic compositing. 
I always think it is very hard for artists to do things such as turn objects in to other objects (at least I know this would be hard for me. Say for instance, making an image that is of a tree, then the roots on the ground turn in to different peoples' hands and the leaves of the trunk turn in to eyes. So in a sense the tree becomes a collaboration of many different human physical characteristics. This seems impossible to me because I am a very amateur Photoshop user, and the whole idea of having a tree whose leaves morph in to eyes and whose roots morph in to hands is just insanely awesome. I guess to do this one could try morphing the pieces of the tree using the liquify tool or maybe the puppet animation tool (is that what it is called?)...I really like the idea of things turning in to unexpected things, and really want to try something like this!

11. Collages, montages, assemblages, and composites often bring together disparate items, objects, scenes, places, and people. The process of combining seemingly unrelated or unexpected items can be inspired by spontaneous thoughts/experiments. Describe some ideas, thoughts, and things that come to mind when you think of “combination” or “assemblage”. Try to perform this brainstorm using a stream of consciousness technique in which you list anything that comes to mind. You can add to this list… Here goes… fractured/combined identities, old newspapers + grass, constant bombarding of images via mass media, looking through a kaleidoscope, doll + baby, cut a bike in half and add a tree, etc. …
Real and artificial objects, vision in the dream world vs waking life, a tree with a body of water sitting on top of it, a human with wings flying over a city, a house with arms and legs, grass as sky and sky as grass...I hope I did this right, it was hard to think of things on the spot!!

Tuesday, January 25, 2011

Light/Shadow/Projection


Composition: For the first two photos, I was interested in framing the photo to make it look as though there was a shadow in the distance and a person was peering through the blinds. The first image is framed more fittingly for this than the second one, however I like how you can see the entire shadow figure in the second image. The rest of the photographs are framed to show the figure within a particular setting. In some images, the subject is centered; in others, the object is off to the side, paying homage to the golden mean (2/3 - 1/3 composition). The vantage point of all these images is slightly below eye level, as I was restricted on where I could shoot from because of the laptops and getting in the way of the projector. All lighting is done by the projector, so it is very even. I used the projection as the background of my image and as the light source of my photographs.
Concept: For the first two photographs, I was interested in creating a sense of fear/eerieness by placing a shadowy figure within the frame and by having Carly peer though blinds, much like we do when we are discretely looking outside for something out of the ordinary. Of course we do not want the figure to see us so we peep through the blinds. The projector helps emphasize this idea by allowing me to make the shadowy figure larger than normal. For the second set of images, I chose to project different photomicroscope images of close-ups of cells. By placing a figure in front of the images, I hope to emphasize the connection between the cells and the body. By putting a sheet over the figure, I hope to create a sense of emergence from the background, so as to further illustrate the connection between the two things. The projector worked as a light source and it also projected the images of these cells in a larger scale so that I was able to place human figure in the front.
Method: For the first images, I attached some blinds to the ceiling. I then reflected a large image of a shadow on to the wall. I then had a person stand behind the blinds and peep out of them. For the second set of images I projected photomicroscope images on to the wall and had them act as the background. I placed a figure with a sheet over his head/body in front of the images in different fashions so as to show the subtle emergence of the figure from the background.
Motivations: While the first images are just my form of playing around, the second images are very important to me. My goal was to show the relationship between cells and the body and to do so by having the figure emerge out of the background in a sort of surreal way. I wanted the 2D image to subtly appear 3D in certain areas. I believe this idea works best in the blueish image.
Interpretation: My viewers did not really understand my concept until I explained it to them. This is probably because the sheet is very loose and does not mimic the human figure very well. This is something that I will have to further explore and try again so that I can get my message across better
Evaluation: ...
Extension: I actually am going to reshoot these images as soon as I can. I realized half-way through the shoot that if I had a "green man suit", a white one realistically, that I could have the figure emerge from the background in exactly the way I want it. When Andy had the white sheet on, the image projected on to it perfectly, so I  think if I could somehow come up with a white suit-like garment that more accurately accented the human figure, I would be able to get my point across more efficiently.

High Dynamic Range Photography

An Alteration of Reality


Composition: For these images, I wanted to create a frame that would emphasize the hi-lights and shadows, while also accentuating the main objects in the image. I wanted the contrast to be surreal and to reflect the extreme aspects of HDR photography. I chose extreme lighting so that when merging the photos in HDR, I would be able to create extreme areas on the image.
Concept: The most interesting attribute of HDR to me is the ability to manipulate the surreality of the outer world. With that being said, I hope to portray a surreal presence of reality with these images.
Method: I put my camera on a tripod and took several images of one subject, ranging from very underexposed to very overexposed. I then merged these images in Bridge, brought them over to Photoshop, and applied a surreal aspect to them. I wanted to keep as much color as possible, so in order to do that I altered the exposure and radius of the surreal effect on the image.
Motivations: My goal for these images was to create a surreal atmosphere. I wanted the images to appear overly colorful and saturated so as to create a somewhat eerie presence.
Interpretation: Of the few people that have viewed my images, all of them agree with the surreal aspects of my photos. The images are said to be somewhat cartoon-like (the arcade ones) and look like reality that has been painted over graphically.
Evaluation: ...
Extension: I plan on continuing with HDR photography, as I love the end result. I wold love to take this idea into portraiture, that is, if I can find a very still person!

Sunday, January 23, 2011

Blog Prompt 2


#5. Think of various cultural, religions, political, personal, scientific associations and symbols of “light” and “darkness”. Discuss some that come to mind. http://www.umich.edu/~umfandsf/symbolismproject/symbolism.html/
In the Chinese culture, the Yin-Yang is the understanding of how things work. The Yin (black) is the "dark" energy, referring to the passive, downward, cold and weak. The Yang (white) is the "light" energy, which is bright, hot, strong, and active. The shape of the symbol alludes to its continuous energy, as both of these energies need each other to make things happen. 
Personally, when it is lighter outside I am more productive, when it is darker outside I feel as though I am more relaxed.
In many cartoons, an example being Snow White, the lighter white symbolizes the good as the dark symbolizes the evil (The queen wears a black clock and her chamber is full of darkness).

#6 Think of some experiences that you have had in which you felt a sense of “lightness”. Describe one or some of these experiences.
When I have gotten a lot accomplished or I achieve something that I am very proud of, I feel an adrenaline rush and begin to feel lighter or somewhat floating (literally lighter in weight). When I am very happy my head feels lighter and it feels as though my stress levels are much lower, thus making my energy feel lighter.

#7. Think of some experiences that you have had in which you felt a sense of “darkness”. Describe one or some of these experiences.
I lost a close relative to death a few years ago, and when this happened I felt a sense of darkness within me. My entire energy became very dull and gloomy and I didn't want to do anything productive. Darker things seem more natural in this mind state, and I would always keep my blinds closed so that sunlight couldn't get in. Loss is a huge ignitor for darkness in the mind.

#8 From the reading on light and shadow, pick an artist/photographer whose work inspires you. Describe why you like her/his work.
The photograph by Bapak Gogon Margono, Javanese Shadow Pupper of Hanuman, is the most interesting to me. It reminds me somewhat of a Tim Burton character and I think it be isolated from anything else enhances its eerie-ness. The distortion of scale in this photograph is very successful in that it could appear to be 10 feet tall, instead of the few inches high that it probably is. It would be cool to see this photograph in large scale, and this photograph makes me want to explore scale distortion.

Thursday, January 20, 2011

Scannography


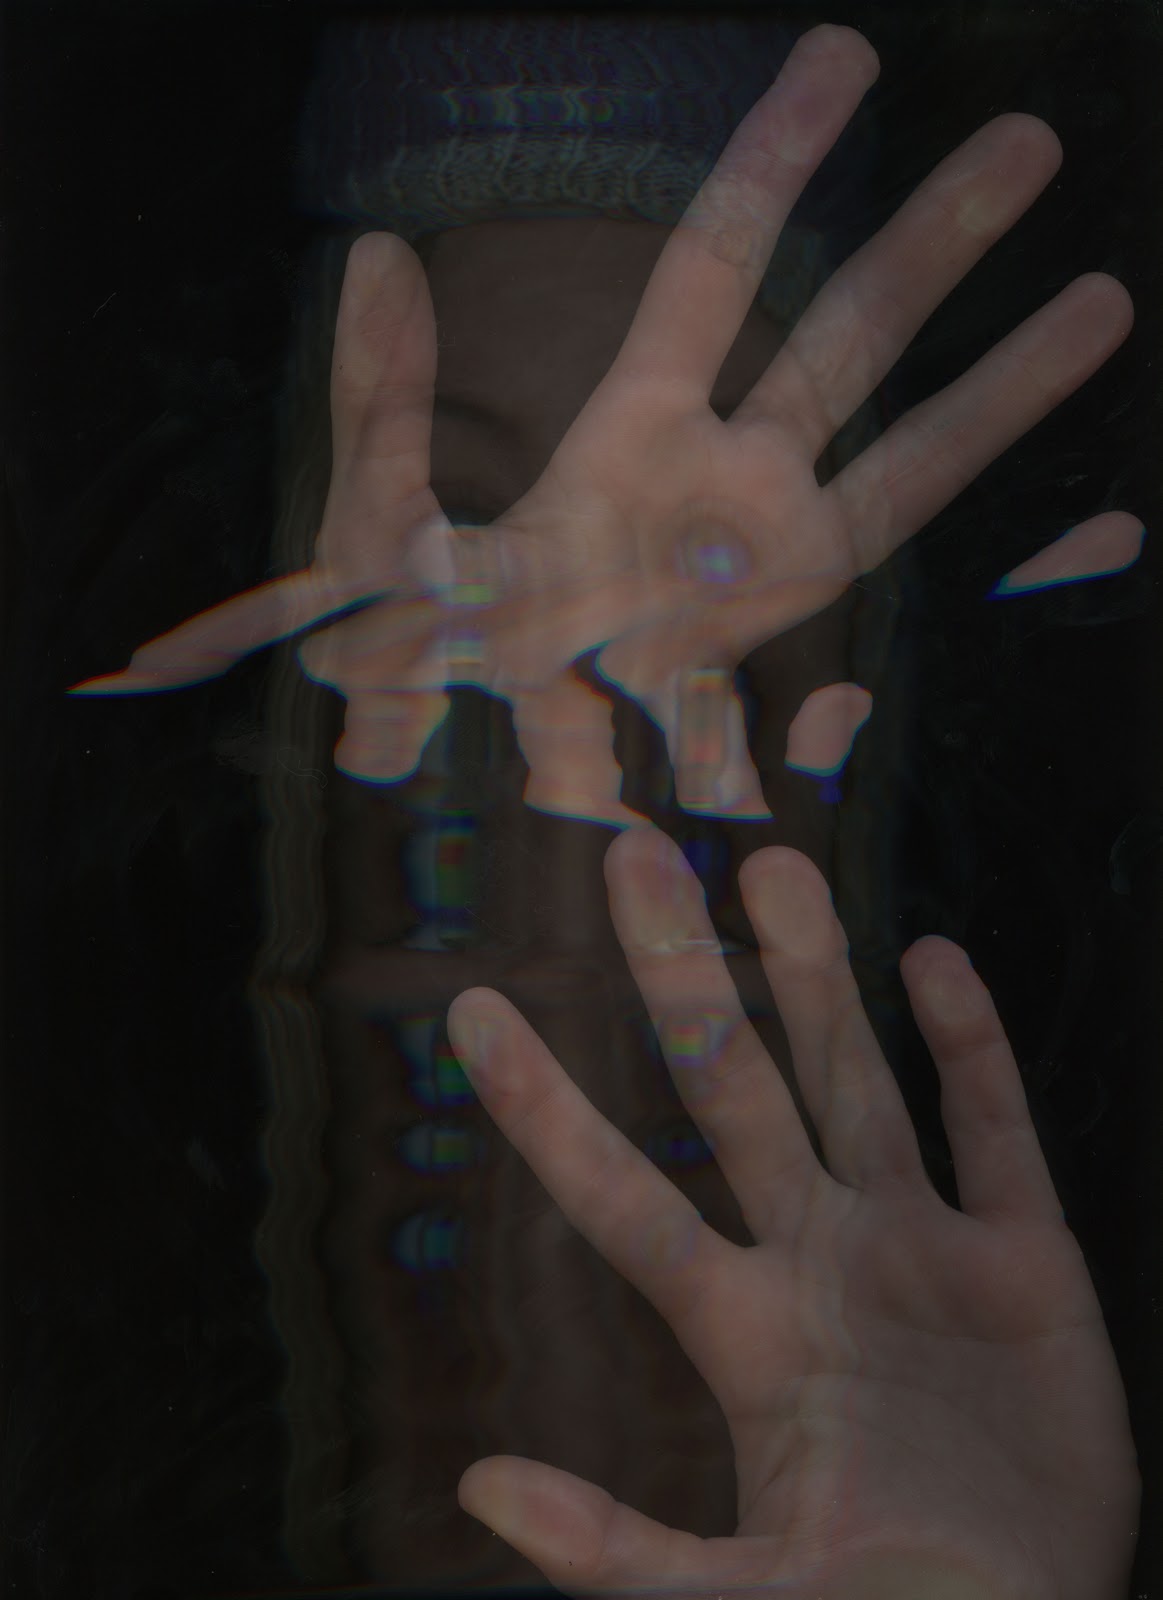
Reflections of myself through Scannography
Composition: For these images, I chose to keep all of the subject matter within the center of the frame, as I wanted the images to feel somewhat balanced. Since these images are taken with a scanner, the vantage point remains pretty frontal and the depth appears incredibly shallow. For the first image I wanted to create a sort of ethereal presence in the subject, whereas for the second image I wanted harsh lines and bold colors protrude from the black space. Both images reflect a sense of movement and time within the frame.
Concept: In producing these images, I aspire to portray a sense of my personality to the viewer. In the first image, I have chosen to create a portrait of my face and hands moving through the frame. I consider myself to be an active person, so movement of objects captured within a still frame is a good reflection of my aways-moving mind. This is portrayed in my second image as well, where the movement of the image captures your eye and makes it wander up and down the frame. I am also a huge fan of color, so the colors within the movement of the second image help to portray the energy within me.
The use of the scanner reflects my ever-moving mind and body as I am able to drag the objects of my images along the light of the scanner in order to create a sense of movement. 
Method: To create the first image, I took one scan while moving my face along the scanner light. I then took another scan of my hands both in motion an still. I took these two scans, layered one on top of the other, and adjusted the opacity levels on each, thus making a sort of ethereal effect. For the second image, I took a bracelet that I wear every day and dragged it left and right along the scanner. I have done scannography in the past, and from it I have learned that when you move objects on the scanner, it will ALWAYS create a prism of color. With trial and error, I have learned how to control how many colors will show up in the scan based on how fast and how much the object is manipulated and moved.
Motivation: My goal in creating these images is to give a sense of my personality with regards to the aesthetics I enjoy and the ways in which I approach the scanner.
Interpretation: I am sure others will see my first image as a portrait of myself. The second image will be a bit trickier to grasp, however I think viewers will see it as something I find beautiful, which in turn reflects my thoughts and ideas.
Evaluation: I was absent for critique.
Extension: I would use the first image as a jumping-off point for a larger series of images by playing around with different ways in which I can make portraits of myself with the scanner. I would notice my weak areas and try to strengthen them (content, sharpness, layering).